Developer Guide
Acknowledgements
- The original codebase for this brownfield project is derived from AddressBook Level-3.
- The following libraries were used: JavaFX, Jackson, JUnit5.
Setting up, getting started
Refer to the guide Setting up and getting started.
Table of Contents
- Design
- Implementation
- Documentation links
- Appendix: Requirements
-
Appendix: Instructions For Manual Testing
- Launch and Shutdown
- Clear Address Book
- Add a Contact
- View a Contact
- List Contacts
- Edit a Contact
- Deleting a Contact
- Add a Meeting
- View a Meeting
- List Meetings
- Edit a Meeting
- Delete a Meeting
- Add contact to Meeting
- Delete Contact From a Meeting Through Meetings
- Delete contact from a meeting through deleting contact
- Add Notes to a Meeting
- Delete Notes from a Meeting
- Saving Data
- Planned Enhancements
Design
.puml files used to create diagrams in this document docs/diagrams folder. Refer to the PlantUML Tutorial at se-edu/guides to learn how to create and edit diagrams.
Architecture
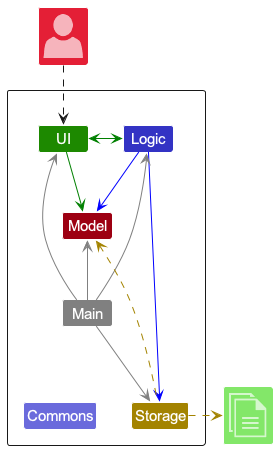
The Architecture Diagram given above explains the high-level design of the App.
Given below is a quick overview of main components and how they interact with each other.
Main components of the architecture
Main (consisting of classes Main
and MainApp) is in charge of the app launch and shut down.
- At app launch, it initializes the other components in the correct sequence, and connects them up with each other.
- At shut down, it shuts down the other components and invokes cleanup methods where necessary.
The bulk of the app’s work is done by the following four components:
-
UI: The UI of the App. -
Logic: The command executor. -
Model: Holds the data of the App in memory. -
Storage: Reads data from, and writes data to, the hard disk.
Commons represents a collection of classes used by multiple other components.
How the architecture components interact with each other
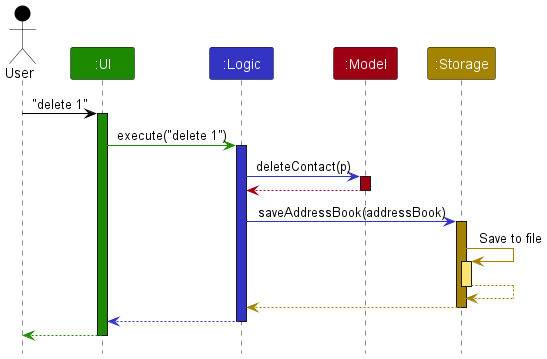
The Sequence Diagram below shows how the components interact with each other for the scenario where the user issues the command delete 1.
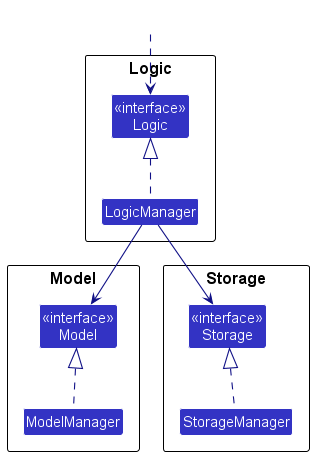
Each of the four main components (also shown in the diagram above),
- defines its API in an
interfacewith the same name as the Component. - implements its functionality using a concrete
{Component Name}Managerclass which follows the corresponding APIinterfacementioned in the previous point.
For example, the Logic component defines its API in the Logic.java interface and implements its functionality using the LogicManager.java class which follows the Logic interface. Other components interact with a given component through its interface rather than the concrete class (reason: to prevent outside component’s being coupled to the implementation of a component), as illustrated in the (partial) class diagram below.
The sections below give more details of each component.
UI component
The API of this component is specified in Ui.java
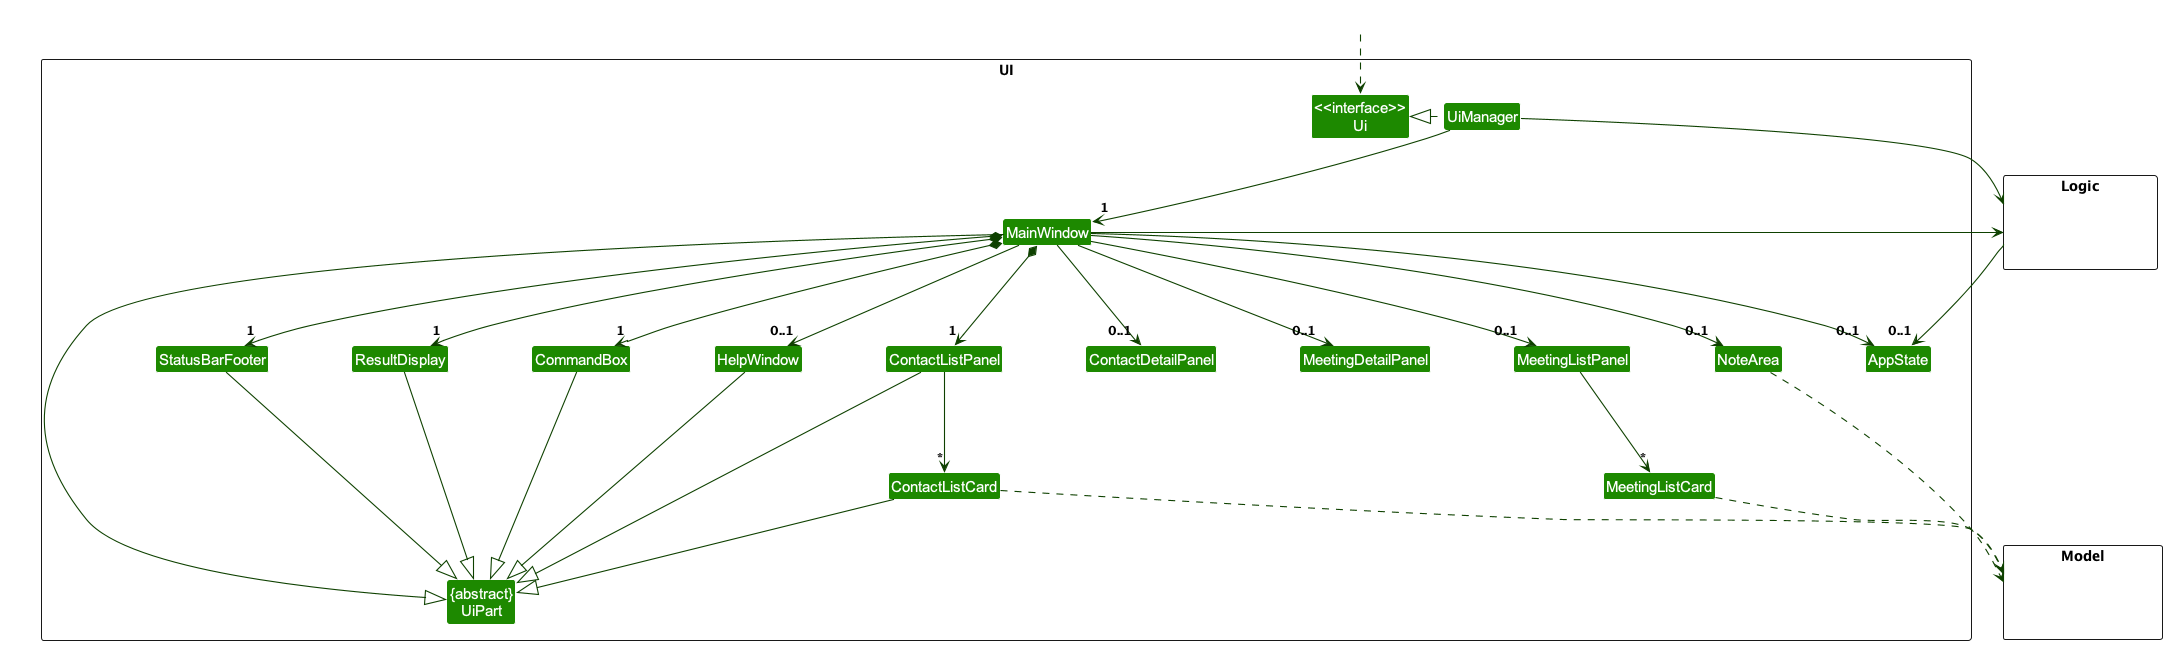
The UI consists of a MainWindow that is made up of parts e.g.CommandBox, ResultDisplay, ContactListPanel, MeetingListPanel, StatusBarFooter etc. All these, including the MainWindow, inherit from the abstract UiPart class which captures the commonalities between classes that represent parts of the visible GUI.
The UI also has an AppState class, which maintains the dynamic aspects of the UI, such as which mode the application is in, which panels are displayed, and the contacts or meetings to be displayed. This allows the UI to remain responsive and accurate to user interactions and command results.
The AppState class is a singleton class, ensuring that the UI components are synchronized with the current state of the application. It is updated (if necessary) when commands are executed in the Logic class, and these updates are checked in the MainWindow class to display on the visible GUI.
The UI component uses the JavaFx UI framework. The layout of these UI parts are defined in matching .fxml files that are in the src/main/resources/view folder. For example, the layout of the MainWindow
is specified in MainWindow.fxml
The UI component,
- executes user commands using the
Logiccomponent. - keeps a reference to the
Logiccomponent, because theUIrelies on theLogicto execute commands. - listens for changes within the
AppStatesingleton class. This is crucial for updating the application’s state based on changes triggered by theLogiccomponent’s operations. - relies on the Model component for displaying
ContactandMeetingobjects. The Model is responsible for managing the in-memory representation of the addressbook data.
Logic component
API : Logic.java
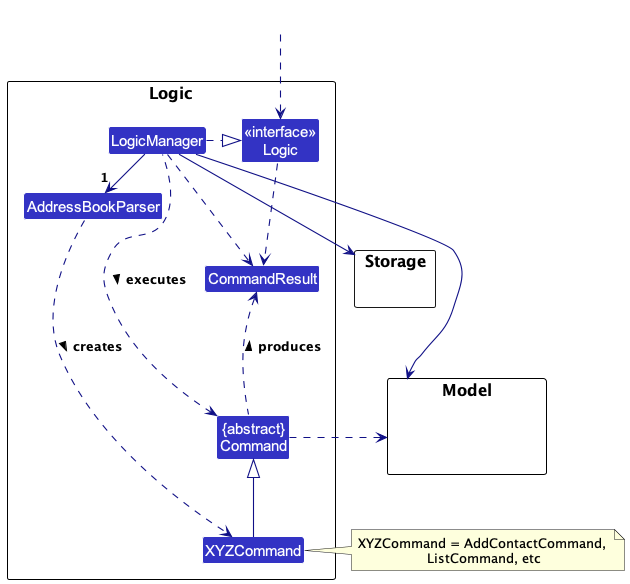
Here’s a (partial) class diagram of the Logic component:
The sequence diagram below illustrates the interactions within the Logic component, taking execute("delete 1") API call as an example.
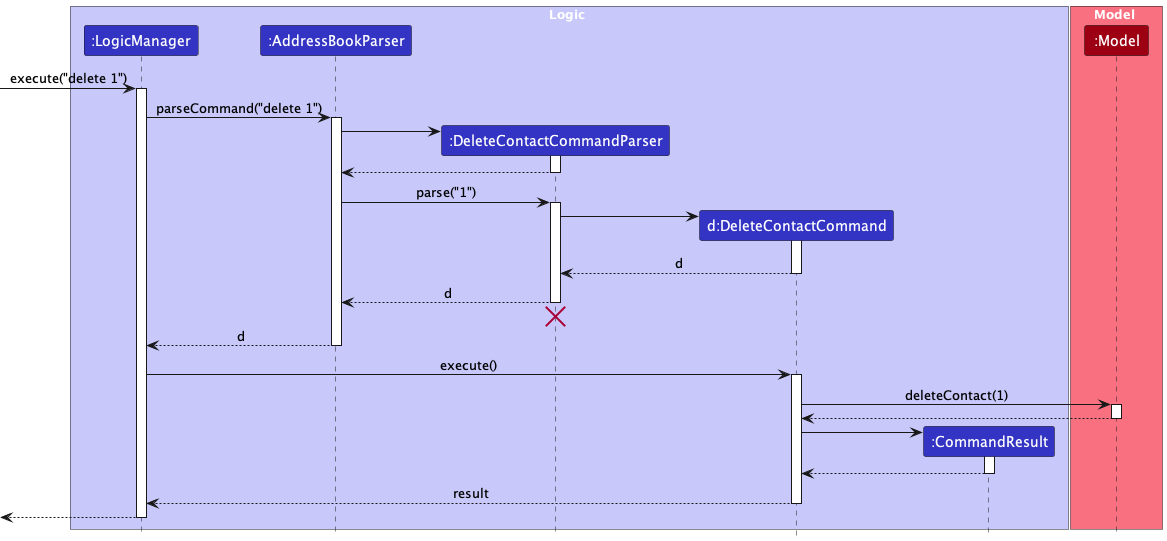
DeleteCommandParser should end at the destroy marker (X) but due to a limitation of PlantUML, the lifeline reaches the end of diagram.
How the Logic component works:
- When
Logicis called upon to execute a command, it is passed to anAddressBookParserobject which in turn creates a parser that matches the command (e.g.,DeleteCommandParser) and uses it to parse the command. - This results in a
Commandobject (more precisely, an object of one of its subclasses e.g.,DeleteCommand) which is executed by theLogicManager. - The command can communicate with the
Modelwhen it is executed (e.g. to delete a contact). - The result of the command execution is encapsulated as a
CommandResultobject which is returned back fromLogic.
Here are the other classes in Logic (omitted from the class diagram above) that are used for parsing a user command:
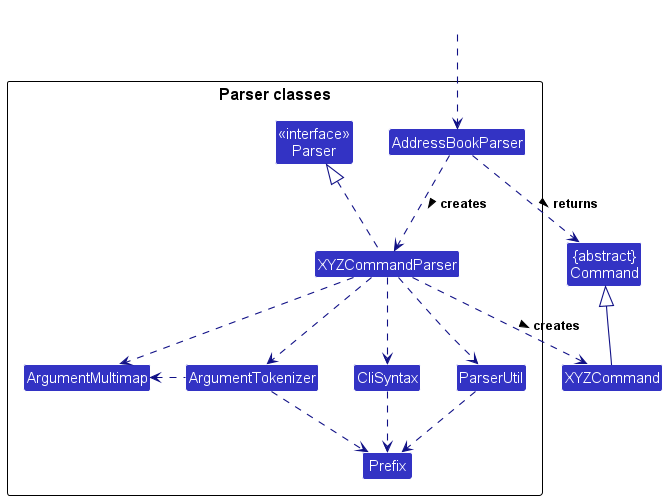
How the parsing works:
- When called upon to parse a user command, the
AddressBookParserclass creates anXYZCommandParser(XYZis a placeholder for the specific command name e.g.,AddCommandParser) which uses the other classes shown above to parse the user command and create aXYZCommandobject (e.g.,AddCommand) which theAddressBookParserreturns back as aCommandobject. - All
XYZCommandParserclasses (e.g.,AddCommandParser,DeleteCommandParser, …) inherit from theParserinterface so that they can be treated similarly where possible e.g, during testing.
Model component
API : Model.java
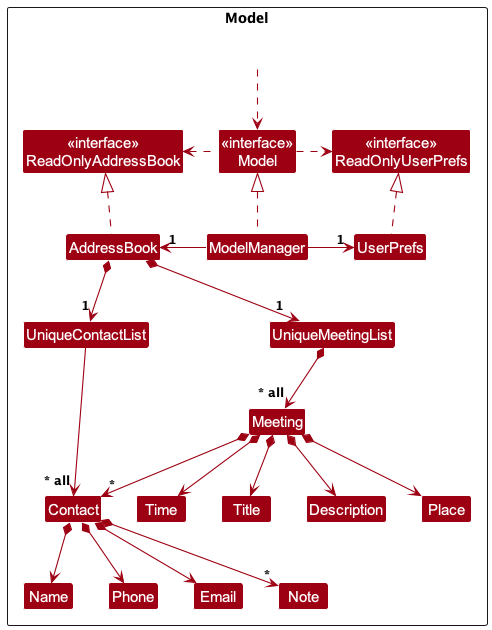
The Model component,
- stores the address book data i.e., all
ContactandMeetingobjects (which are contained in aUniqueContactListandUniqueMeetingListobject respectively). - stores a
UserPrefobject that represents the user’s preferences. This is exposed to the outside as aReadOnlyUserPrefobjects. - does not depend on any of the other three components (as the
Modelrepresents data entities of the domain, they should make sense on their own without depending on other components)
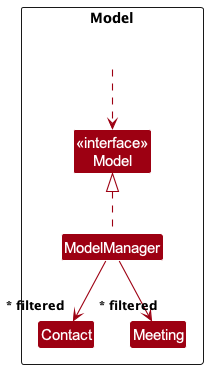
- stores the currently ‘selected’
ContactorMeetingobjects (e.g., results of a search query) as a separate filtered list which is exposed to outsiders as an unmodifiableObservableList<Contact>orObservableList<Meeting>respectively that can be ‘observed’ e.g. the UI can be bound to this list so that the UI can fetch this data into itsAppStateclass when necessary, and reflect these changes on the GUI.
Storage component
API : Storage.java
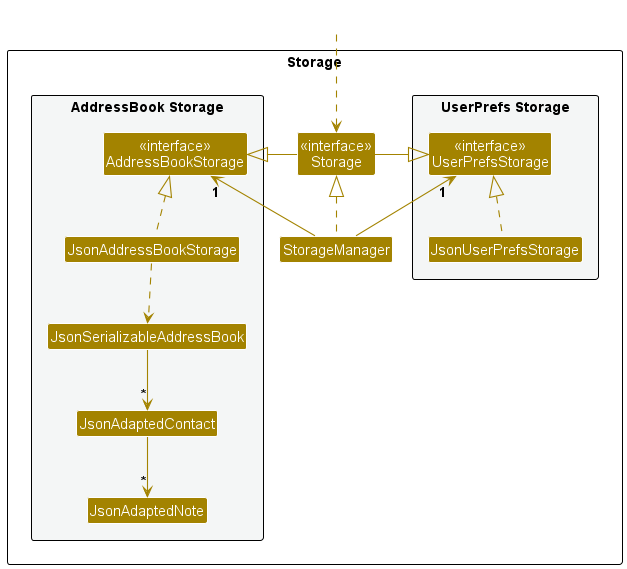
The Storage component,
- can save both address book data and user preference data in JSON format, and read them back into corresponding objects.
- inherits from both
AddressBookStorageandUserPrefStorage, which means it can be treated as either one (if only the functionality of only one is needed). - depends on some classes in the
Modelcomponent (because theStoragecomponent’s job is to save/retrieve objects that belong to theModel)
Common classes
Classes used by multiple components are in the seedu.addressbook.commons package.
Implementation
This section describes some noteworthy details on how certain features are implemented.
Command History and Auto-Complete Feature
Context
The command history and auto-complete feature aims to enhance user experience by allowing users to quickly access previously executed commands and complete partial command inputs. This feature is especially useful for users who perform a series of similar commands consecutively, as it saves time and reduces the likelihood of input errors.
By utilizing this command history and auto-complete feature, users can improve their efficiency when interacting with the application, significantly speeding up the workflow for repetitive command entry.
Implementation
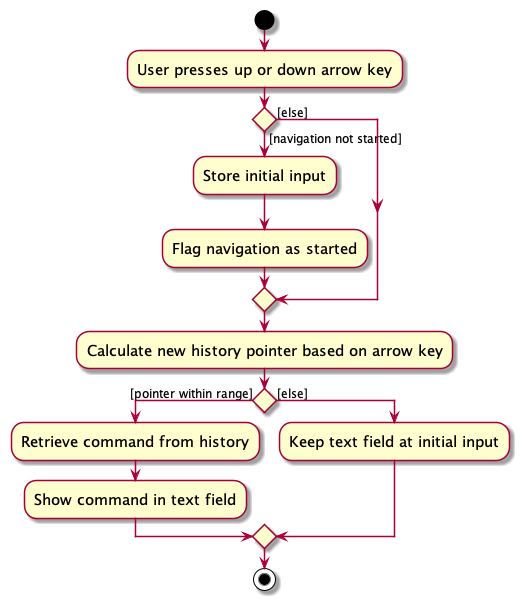
The CommandBox component is at the heart of this feature. It maintains a list of the user’s command history and provides functionalities to navigate through this history using keyboard inputs.
-
Storing Command History: As users execute commands, these are stored in a
commandHistorylist in theCommandBox. Duplicate entries are prevented by removing the previous instance of the command before re-adding it, ensuring the most recent use is at the end of the list. -
Navigation Through Command History: The user can navigate through the command history by pressing the up or down arrow keys. The
navigateCommandHistory(int offset)method updates thecurrentHistoryPointerand sets the text of thecommandTextFieldto the command at the new history pointer index. -
Auto-Completion Mechanism: The auto-complete mechanism is triggered when the user starts typing a command and presses the up or down arrow key. The
getFilteredHistory()method retrieves a list of commands that start with the current input, allowing the user to cycle through relevant commands only.
The following activity diagram represents the sequence of actions that occur when the user navigates through the command history in the CommandBox:
Design Considerations:
Alternative 1 (current choice): Store Commands as Strings and use pointers
- Pros: Simple implementation with low overhead. Efficient in terms of memory and processing as it works with strings directly.
- Cons: Limited functionality for more complex use cases. Does not allow for structured analysis or manipulation of command components.
Alternative 2: Store Commands as Objects
- Pros: Offers greater flexibility for future enhancements, such as argument analysis and command editing. Facilitates complex command manipulations and extensions.
- Cons: More complex implementation. Requires additional memory and processing to manage command objects instead of simple strings. Also, not as intuitive since you do not saved failed commands.
Mode feature
Context
At the time when this feature was implemented, the commands within the application were split into 3 broad categories: Commands for contacts, commands for meetings, and general commands.
However, users had to specify each command in entirety without regard for which category the command belonged to. For example when adding a contact to a meeting, the user had to type add contact to meeting n/ContactName m/MeetingName.
This format was too lengthy and it seemed highly likely that when a user is interacting with a specific category of commands, they would interact with it more often than the other categories. For example when a user adds a meeting, it more likely that the user follows up with adding contacts or notes to the meeting as compared to other functions of the application.
To improve upon this, a mode feature was implemented so that users can be either in the contact mode or meeting mode and when a command is run it will automatically be translated into the respective contact or meeting command. So instead of typing add contact to meeting, the user could instead type addcontact while running in the meeting mode.
Implementation
Firstly, in order to keep track of the current mode the application is running in, an AppState singleton class was added to keep track of what is now known as ModeType, an Enum which can only be CONTACTS or MEETINGS. The general commands such as exit, help and mode itself does not need a ModeType because such commands can be run while in any ModeType. Additionally, the default ModeType when initializing a ModelManager is CONTACTS for no particular reason.
Secondly, the Mode command itself is implemented where upon executing the command, the model will update AppState which will in turn update its FilteredContactList or FilteredMeetingList to show the user the entire contact or meeting list respectively.
Thirdly, all affected commands had to have their formats changed to suit the new style of running under a certain context.
Lastly, the AddressBookParser had to be modified to accomodate the new modes and command formats.
Below is a sequence diagram showing how the running ModeType of the application is changed.

Design considerations:
Alternative 1 (current choice): Implement the mode command as a standalone without arguments
- Pros: Easy to implement. User can easily toggle between
CONTACTSandMEETINGSModeType. - Cons: Less extensible by developers if in the future there are new ModeTypes.
Alternative 2: Implement the mode command with arguments e.g mode -type CONTACTS
- Pros: Easily extensible by developers, can just add a new enum for a new ModeType.
- Cons: More troublesome to implement. Harder to use for the users.
Contain Contacts in Meeting Feature
Implementation (Add Contact to Meeting)
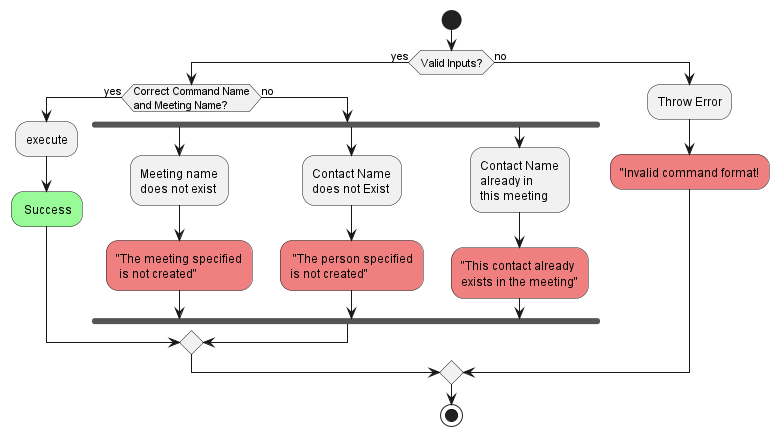
With a given MeetingTitle and Contact Name, we first check for whether the contact and meeting exists in addressBook. If either is not found, we throw an error as per the activity diagram.
Next, we register the meeting as a observer to the contact, which will be notified when this contact is deleted from address book, which will then delete the contact from itself.
We then add the contact to the contact list of the meeting.
Implementation (Delete Contact From Meeting)
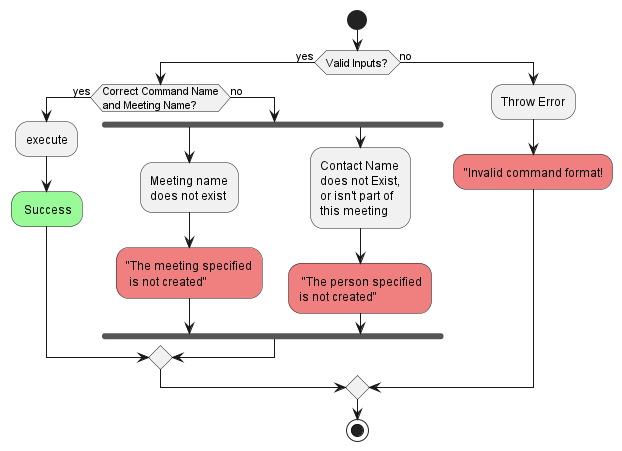
With a given MeetingTitle and Contact Name, we first check for whether meeting exists in addressBook and whether the contact resides in the meeting. If either is not found, we throw an error as per the activity diagram.
The contact is then removed from the meeting.
Note Feature
Context
Note-taking is the fundamental feature behind our app. It is critical for our users to be able to efficiently record notes for contacts and meetings.
The full implementation of the feature will include creating, reading, and deleting notes. A possible extension is giving users the ability to edit previous notes, but that is outside the scope of our project for now.
Implementation (Add Notes)
A new Note class was created, which stores the contents of the note as a string. The Contact/Meeting model was then updated to include a new notes attribute of type ArrayList<Note>.
To distinguish between adding notes to contacts and meetings, 2 separate Command classes are created, namely
AddNoteCommand (for contacts) and AddMeetingNoteCommand (for meetings). For brevity, this documentation is written in the context of Contacts. However, rest assured that the implementation is the same for Meetings.
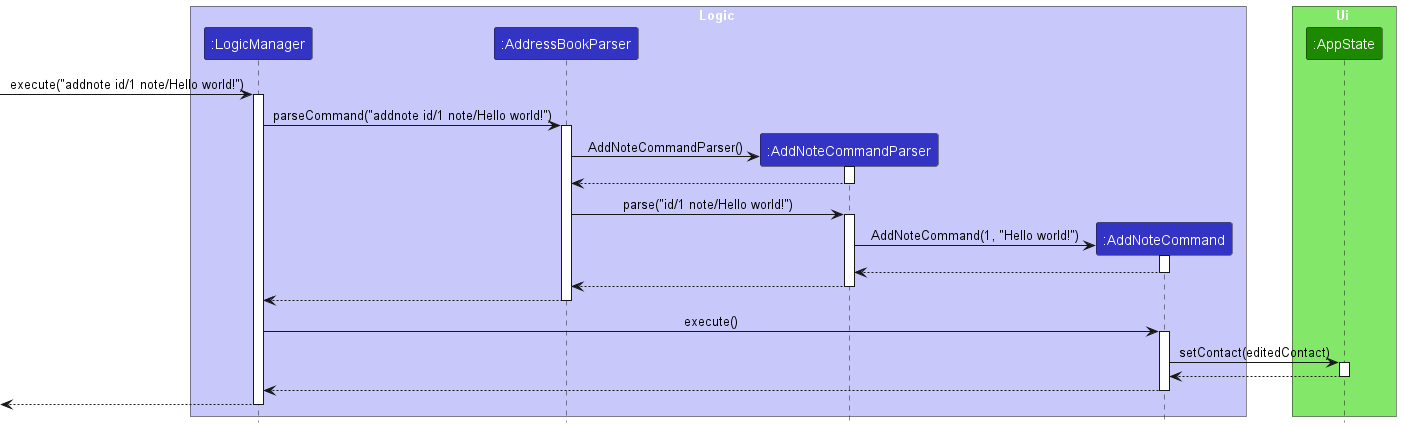
The AddNoteCommand will call its respective parser class, AddNoteCommandParser, to get the arguments passed in by the user. The arguments include the index of the target contact using the id/ prefix, and the note itself with the note/ prefix.
Before execution, NoteNote will check that the supplied arguments are valid. The conditions of a valid index and note can be found in the User Guide. NoteNote will also check for the presence of duplicate notes, in which case an exception will be thrown.
When the command is executed, NoteNote will get the indexed Contact object from the Model’s FilteredContactList. Internally, the model will duplicate the existing list of notes and append the additional note.
Then, a new Contact object will be created with identical attributes as the original, besides the updated notes list. This is object is called editedContact, and the model is then updated with this. The AppState is then refreshed to ensure the latest list of notes are being displayed.
Below is a simplified, high-level sequence diagram that illustrates what happens when the command addnote 1 note/Hello world! is executed in CONTACTS mode, given that there is at least one contact added.
Implementation (Delete Notes)
Behind the scenes, the implementation of deleting notes is largely similar to that of adding notes. There are separate commands classes and parser classes for deleting notes from contacts and from meetings. Once again, this section zooms in on the context of Contacts, but the implementation details are the same for Meetings.
In terms of execution, a user will pass the index of the note to be deleted as an argument, as well as the index of the Contact.
The current list of notes from the target contact is then retrieved. Using ArrayList’s remove() method, the target note is then deleted from this list.
Once again, a new Contact object is then created, with the same attributes as the original one besides the new list of notes. The model will then be updated with this new Contact object. AppState is updated as well to ensure the GUI is refreshed.
Design Considerations
- Alternative 1: store
notesattribute inContactmodel asSet<Note>- Pros: Simpler to implement (similar to existing
Tagimplementation). - Cons: Notes will appear in an arbitrary order, rather than chronologically.
- Pros: Simpler to implement (similar to existing
[Proposed] Undo/redo feature
Proposed Implementation
The proposed undo/redo mechanism is facilitated by VersionedAddressBook. It extends AddressBook with an undo/redo history, stored internally as an addressBookStateList and currentStatePointer. Additionally, it implements the following operations:
-
VersionedAddressBook#commit()— Saves the current address book state in its history. -
VersionedAddressBook#undo()— Restores the previous address book state from its history. -
VersionedAddressBook#redo()— Restores a previously undone address book state from its history.
These operations are exposed in the Model interface as Model#commitAddressBook(), Model#undoAddressBook()
and Model#redoAddressBook() respectively.
Given below is an example usage scenario and how the undo/redo mechanism behaves at each step.
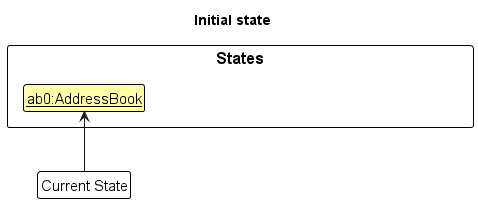
Step 1. The user launches the application for the first time. The VersionedAddressBook will be initialized with the initial address book state, and the currentStatePointer pointing to that single address book state.
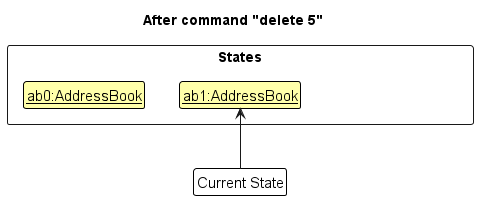
Step 2. The user executes delete 5 command to delete the 5th contact in the address book. The delete command calls Model#commitAddressBook(), causing the modified state of the address book after the delete 5 command executes to be saved in the addressBookStateList, and the currentStatePointer is shifted to the newly inserted address book state.
Step 3. The user executes add n/David … to add a new contact. The add command also calls Model#commitAddressBook(), causing another modified address book state to be saved into the addressBookStateList.
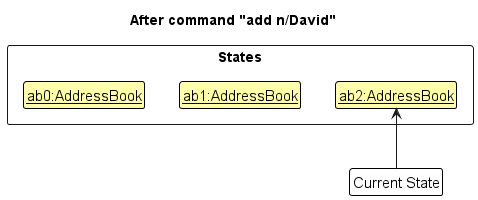
Model#commitAddressBook(), so the address book state will not be saved into the addressBookStateList.
Step 4. The user now decides that adding the contact was a mistake, and decides to undo that action by executing the undo command. The undo command will call Model#undoAddressBook(), which will shift the currentStatePointer
once to the left, pointing it to the previous address book state, and restores the address book to that state.

currentStatePointer is at index 0, pointing to the initial AddressBook state, then there are no previous AddressBook states to restore. The undo command uses Model#canUndoAddressBook() to check if this is the case. If so, it will return an error to the user rather
than attempting to perform the undo.
The following sequence diagram shows how the undo operation works:
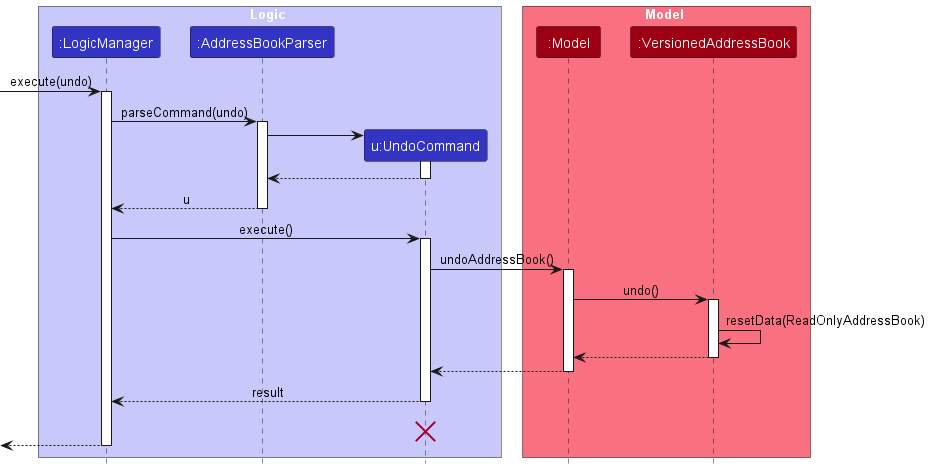
UndoCommand should end at the destroy marker (X) but due to a limitation of PlantUML, the lifeline reaches the end of diagram.
The redo command does the opposite — it calls Model#redoAddressBook(), which shifts the currentStatePointer once to the right, pointing to the previously undone state, and restores the address book to that state.
currentStatePointer is at index addressBookStateList.size() - 1, pointing to the latest address book state, then there are no undone AddressBook states to restore. The redo command uses Model#canRedoAddressBook() to check if this is the case. If so, it will return an error to the user rather than attempting to perform the redo.
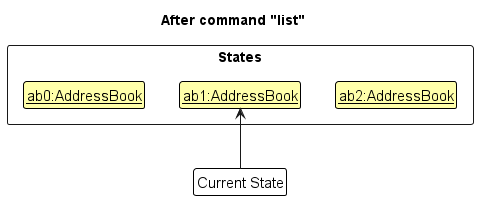
Step 5. The user then decides to execute the command list. Commands that do not modify the address book, such as list, will usually not call Model#commitAddressBook(), Model#undoAddressBook() or Model#redoAddressBook(). Thus, the addressBookStateList remains unchanged.
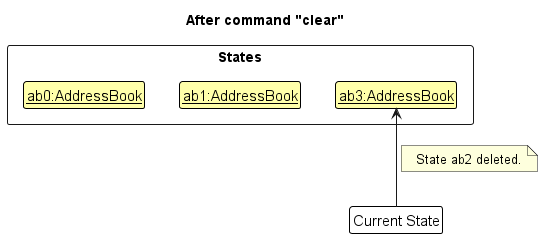
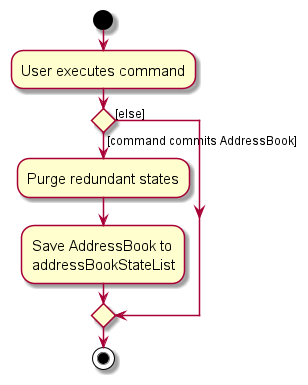
Step 6. The user executes clear, which calls Model#commitAddressBook(). Since the currentStatePointer is not pointing at the end of the addressBookStateList, all address book states after the currentStatePointer will be purged. Reason: It no longer makes sense to redo the add n/David … command. This is the behavior that most modern desktop applications follow.
The following activity diagram summarizes what happens when a user executes a new command:
Design considerations:
Aspect: How undo & redo executes:
-
Alternative 1 (current choice): Saves the entire address book.
- Pros: Easy to implement.
- Cons: May have performance issues in terms of memory usage.
-
Alternative 2: Individual command knows how to undo/redo by itself.
- Pros: Will use less memory (e.g. for
delete, just save the contact being deleted). - Cons: We must ensure that the implementation of each individual command are correct.
- Pros: Will use less memory (e.g. for
Documentation, logging, testing, configuration, dev-ops
Appendix: Requirements
Product scope
Target user profile:
- Has a need to manage a significant number of contacts and meetings
- Prefer desktop apps over other types
- Can type fast
- Prefers typing to mouse interactions
- Is reasonably comfortable using CLI apps
Value proposition:
-
Allow users to manage their meeting minutes based on their contacts
-
Manage contacts faster than a typical mouse/GUI driven app
User stories
Priorities: High (must have) - * * *, Medium (nice to have) - * *, Low (unlikely to have) - *
| Priority | As a … | I can … | So that I can… |
|---|---|---|---|
* * * |
user | create meeting cards | keep track of meeting details |
* * * |
user | view my list of meetings | see my upcoming meetings |
* * * |
user | edit my meeting cards | make changes to the meeting |
* * * |
user | take notes about meetings | remember key points of discussion |
* * * |
user | delete a meeting | remove unwanted meeting cards |
* * * |
user | create contact cards | keep track of a contact’s details |
* * * |
user | view my list of contacts | keep track of the people I know |
* * * |
user | edit my contact cards | make changes to a contact’s details |
* * * |
user | delete contacts | manage my contacts |
* * * |
user | create notes for contacts | keep track of additional information for my contacts |
* * |
user | tag contacts | filter my contacts based on subjects or courses |
* * |
user | attach a photo to a contact | visually identify and remember my classmates |
* * |
user | color-code my contacts | for a visual representation of my network |
* * |
new user | see a list of commands | learn more about how to use the application |
* * |
new user | have a default timezone | dates are accurately recorded in my timezone |
* * |
user | pin important contacts | find my important contacts quickly |
* * |
user | see a list of upcoming meetings and tasks for the day | know how to plan my day |
* * |
user | add hyperlinks or references to online resources within notes | have the convenience of one-click access to online materials |
* * |
forgetful user | set a reminder for an upcoming meeting | I won’t miss the meeting |
* * |
user | create follow-up action items within a meeting’s notes | keep track of important tasks for a meeting |
* * |
user | set deadlines for action items | ensure action items are completed in a timely manner |
* * |
user | set reminders for action items | I won’t forget the action items |
* * |
user | view the edit history of my notes | backtrack on my note-taking changes |
* |
experienced user | encrypt my contact and meeting cards | ensure the privacy and security of my data |
* |
experienced user | backup my contact and meeting cards | ensure redundancy for my data |
* |
user | filter contacts based on collaboration frequency | identify frequent collaborators |
* |
forgetful user | see a list of the most recent actions I have performed | remember what I have added or deleted |
Use cases
(For all use cases below, the System is the NoteNote and the Actor is the user, unless specified otherwise)
UC01 - Create a meeting
MSS
- User requests to create a meeting.
- NoteNote creates the meeting card.
-
NoteNote displays the newly created meeting card.
Use case ends.
Extensions
-
1a. The request is in an improper format.
- 1a1. NoteNote shows an error message.
-
1a2. User request to create a meeting in the correct format.
Use case resumes at step 2.
-
1b. The meeting already exists in NoteNote.
-
1b1. NoteNote shows an error message.
Use case ends.
-
UC02 - Delete a meeting
MSS
- User requests to delete a meeting.
- NoteNote deletes the meeting.
-
NoteNote updates the display.
Use case ends.
Extensions
-
1a. The request is in an improper format.
- (Refer to UC01, 1a)
-
1b. The specified meeting index is invalid or does not exist in NoteNote.
- (Refer to UC01, 1b)
UC03 - Edit a meeting
MSS
- User requests to edit an attribute in a meeting.
- NoteNote applies the requested changes.
-
NoteNote displays the updated meeting card.
Use case ends.
Extensions
-
1a. The request is in an improper format.
- (Refer to UC01, 1a)
-
1b. The specified meeting index is invalid or does not exist in NoteNote.
- (Refer to UC01, 1b)
UC04 - Take notes about meetings
MSS
- User requests to add notes to a meeting.
- The meeting is updated with the given notes.
-
NoteNote displays the meeting with the updated notes.
Use case ends.
Extensions
- 1a. The request is in an improper format.
- 1a1. NoteNote shows an error message.
-
1a2. User requests to add notes to a meeting in the correct format.
Use case resumes at step 2.
-
1b. The specified meeting(s) do/does not exist in NoteNote.
-
1b1. NoteNote shows an error message.
Use case ends.
-
- 1c. The note is invalid.
-
1c1. NoteNote shows an error message.
Use case ends.
-
UC05 - Delete notes from meetings
MSS
- User requests to delete notes from a meeting.
- NoteNote deletes the specified note from the meeting.
-
NoteNote displays the updated meeting without the deleted note.
Use case ends.
Extensions
- 1a. The request is in an improper format.
- 1a1. NoteNote shows an error message.
-
1a2. User requests to delete notes from a meeting in the correct format.
Use case resumes at step 2.
-
1b. The specified meeting does not exist in NoteNote.
-
1b1. NoteNote shows an error message.
Use case ends.
-
- 2a. The specified note does not exist in NoteNote.
-
2a1. NoteNote shows an error message.
Use case ends.
-
UC06 - Add additional contacts to a meeting
MSS
- User creates a meeting (UC01).
- User requests to add contacts to the meeting.
-
NoteNote displays the details of the meeting with the newly added contact.
Use case ends.
Extensions
-
2a. The request is in an improper format.
- 2a1. NoteNote shows an error message.
-
2a2. User request to add contacts to the meeting in the correct format.
Use case resumes at step 3.
-
2b. The specified contact(s)/meeting do/does not exist in NoteNote.
- 2b1. NoteNote shows an error message.
-
2b2. User requests to add contacts with existing contact(s)/meeting.
Use case resumes at step 3.
-
2c. The contact(s) has/have already been added to the meeting.
-
2c1. NoteNote shows an error message.
Use case ends.
-
Non-Functional Requirements
- Should work on any mainstream OS as long as it has Java
11or above installed. - Should be able to hold up to 1000 contacts without a noticeable sluggishness in performance for typical usage.
- A user with above average typing speed for regular English text (i.e. not code, not system admin commands) should be able to accomplish most of the tasks faster using commands than using the mouse.
Glossary
- Mainstream OS: Windows, Linux, Unix, OS-X
Appendix: Instructions for manual testing
Given below are instructions to test the app manually.
Launch and shutdown
-
Initial launch
-
Download the jar file and copy into an empty folder
-
Double-click the jar file Expected: Shows the GUI with a set of sample contacts. The window size may not be optimum.
-
-
Saving window preferences
-
Resize the window to an optimum size. Move the window to a different location. Close the window.
-
Re-launch the app by double-clicking the jar file.
Expected: The most recent window size and location is retained.
-
Clear address book
- Clear all contacts and meetings from the address book
-
Test case:
clearExpected: All contacts and meetings should be cleared from the address book. Contact/Meeting list and contact/meeting details panel should be blank.
-
Add a contact
- Add a contact to the contact list
-
Prerequisites: Switch to the
contactsmode if not already so using themodecommand -
Test case:
add n/Sarah Woo p/82775346 e/sarah.woo@gmail.comExpected: Sarah Woo is added into the contact list. Details of the newly added contact shown in the result box. Contact details panel shows details of new contact.
-
Test case:
add n/Sarah Woo% p/82775346 e/sarah.woo@gmail.comExpected: Sarah Woo% is not added into the contact list. Error message due to invalid name shown in the result box. Contact details panel unchanged.
-
View a contact
- View an existing contact’s details
-
Prerequisites: Switch to the
contactsmode if not already so using themodecommand. -
Test case:
view 1Ensure that at least 1 contact is in the list.
Expected: Contact details of the contact with index 1 is shown on the detail panel on the bottom right.
-
Test case:
view 0Expected: Detail panel does not change. Error message due to invalid command format
-
Test case:
view 2Ensure that less than 2 contacts are in the contact list.
Expected: Detail panel does not change. Error message due to invalid index.
-
List contacts
- List contacts based on given parameter(s)
-
Prerequisites: Switch to the
contactsmode if not already so using themodecommand.Run the following commands:
clearadd n/Sarah Woo p/82775346 e/sarah.woo@gmail.comadd n/David Woo p/82775346 e/david.woo@gmail.comadd n/Carl Woo p/821345 e/carl.woo@gmail.com
-
Test case:
listExpected: All 3 contacts should appear in the contact list. Result box shows 3 contacts listed.
-
Test case:
list p/82775346Expected: Only Sarah and David should appear in the contact list. Result box shows 2 contacts listed.
-
Test case:
list asdfasdgasdgasExpected: All 3 contacts should appear in the contact list. Result box shows 3 contacts listed.
-
Edit a contact
- Edit an existing contact’s details
-
Prerequisites: Switch to the
contactsmode if not already so using themodecommand. -
Test case:
edit 1 p/90649923Ensure that at least 1 contact is in the list.
Expected: Contact detail of contact with index 1 phone number changed to
90649923. Contact details of the contact with index 1 is shown on the detail panel on the bottom right. -
Test case:
edit 0 p/90649923Expected: Detail panel does not change. Error message due to invalid command format
-
Other incorrect edit commands to try:
edit 1 n/asdf!@#$,edit x ...(where x is larger than the list size)
Expected: Similar to previous with appropriate error messages.
-
Deleting a contact
-
Deleting a contact while all contacts are being shown
-
Prerequisites: Switch to the
contactsmode if not already so using themodecommand. List all contacts using thelistcommand. Multiple contacts in the list. -
Test case:
delete 1Expected: First contact is deleted from the list. Details of the deleted contact shown in the status message.
-
Test case:
delete 0Expected: No contact is deleted. Error details shown in the status message. Status bar remains the same.
-
Other incorrect delete commands to try:
delete,delete x(where x is larger than the list size)
Expected: Similar to previous with appropriate error messages.
-
Add a meeting
- Add a meeting to the meeting list
-
Prerequisites: Switch to the
meetingsmode if not already so using themodecommand -
Test case:
add m/ Project Discussion t/ 03/10/2023 15:00 p/ Terrace d/ Discussing milestoneExpected: Project Discussion is added into the meeting list. Details of the newly added meeting shown in the result box. Meeting details panel shows details of the new meeting.
-
Test case:
add m/ Project Discussion% t/ 03/10/2023 15:00 p/ Terrace d/ Discussing milestoneExpected: Project Discussion% is not added into the contact list. Error message due to invalid title shown in the result box. Meeting details panel unchanged.
-
View a meeting
- View an existing meeting’s details
-
Prerequisites: Switch to the
meetingsmode if not already so using themodecommand. -
Test case:
view 1Ensure that at least 1 meeting is in the list.
Expected: Meeting details of the meeting with index 1 is shown on the detail panel on the bottom right.
-
Test case:
view 0Expected: Detail panel does not change. Error message due to invalid command format
-
Test case:
view 2Ensure that less than 2 meetings are in the contact list.
Expected: Detail panel does not change. Error message due to invalid index.
-
List meetings
- List meetings based on given parameter(s)
-
Prerequisites: Switch to the
meetingsmode if not already so using themodecommand.Run the following commands:
clearadd m/ Project Discussion 1 t/ 03/10/2023 15:00 p/ Terrace d/ Discussing milestoneadd m/ Project Discussion 2 t/ 03/10/2023 17:00 p/ Terrace d/ Discussing milestoneadd m/ Project Discussion 3 t/ 03/10/2023 15:00 p/ Terrace d/ Discussing milestone
-
Test case:
listExpected: All 3 meetings should appear in the meeting list. Result box shows 3 meetings listed.
-
Test case:
list ts/ 03/10/2023 17:00Expected: Only Project Discussion 2 should appear in the meeting list. Result box shows 1 meeting listed.
-
Test case:
list adasdsaExpected: All 3 meetings should appear in the meeting list. Result box shows 3 meetings listed.
-
Edit a meeting
- Edit an existing meeting’s details
-
Prerequisites: Switch to the
meetingsmode if not already so using themodecommand. -
Test case:
edit 1 t/03/11/2023 15:00Ensure that at least 1 meeting is in the list.
Expected: Meeting detail of contact with index 1 time changed to
03/11/2023 15:00. Meeting details of the meeting with index 1 is shown on the detail panel on the bottom right. -
Test case:
edit 0 t/03/11/2023 15:00Expected: Detail panel does not change. Error message due to invalid command format
-
Other incorrect edit commands to try:
edit 1 t/asdf!@#$,edit x ...(where x is larger than the list size)
Expected: Similar to previous with appropriate error messages.
-
Delete a meeting
-
Deleting a meeting while all meetings are being shown
-
Prerequisites: Switch to the
meetingsmode if not already so using themodecommand. List all meetings using thelistcommand. Multiple meetings in the list. -
Test case:
delete 1Expected: First meeting is deleted from the list. Details of the deleted meeting shown in the result box.
-
Test case:
delete 0Expected: No meeting is deleted. Error details shown in the result box.
-
Other incorrect delete commands to try:
delete,delete x(where x is larger than the list size)Expected: Similar to previous with appropriate error messages.
-
Add contact to meeting
-
Add an existing contact to an existing meeting
-
Prerequisites: Start in the
contactsmode.Run the following commands:
clearadd n/ John Doe p/ 98765432 e/ johnd@example.commodeclearadd m/ Project Discussion t/ 03/10/2023 15:00 p/ Terrace d/ Discussing milestone
-
Test case:
addcontact n/John Doe m/Project DiscussionExpected: John Doe is added to the contacts of the meeting. Details of the deleted meeting shown in the result box. Meeting details panel updatd with the new meeting details.
-
Test case:
addcontact n/Sarah m/Project DiscussionExpected: No changes to the meeting. Error details shown in the result box.
-
Other incorrect delete commands to try:
addcontact n/XYZ m/ABC(where XYR and/or ABC does not exist in the address book)Expected: Similar to previous with appropriate error messages.
-
Delete contact from a meeting through meetings
-
Delete an existing contact from an existing meeting
-
Prerequisites: Start in the
contactsmode.Run the following commands:
clearadd n/ John Doe p/ 98765432 e/ johnd@example.commodeclearadd m/ Project Discussion t/ 03/10/2023 15:00 p/ Terrace d/ Discussing milestoneaddcontact n/John Doe m/Project Discussion
-
Test case:
deletecontact n/John Doe m/Project DiscussionExpected: John Doe is deleted from the contacts of the meeting. Details of the deleted meeting shown in the result box. Meeting details panel updated with the new meeting details.
-
Test case:
deletecontact n/Sarah m/Project DiscussionExpected: No changes to the meeting. Error details shown in the result box.
-
Other incorrect deletecontact commands to try:
deletecontact n/XYZ m/ABC(where XYR and/or ABC does not exist in the address book)Expected: Similar to previous with appropriate error messages.
-
Delete contact from a meeting through deleting contact
-
Delete an existing contact from an existing meeting
-
Prerequisites: Start in the
contactsmode.Run the following commands:
clearadd n/ John Doe p/ 98765432 e/ johnd@example.commodeadd m/ Project Discussion t/ 03/10/2023 15:00 p/ Terrace d/ Discussing milestoneaddcontact n/John Doe m/Project Discussion
-
Test case:
delete 1(while in thecontactsmode)Expected: John Doe is deleted from the contacts of the meeting.
-
Add notes to a meeting
-
Add a note to an existing meeting
-
Prerequisites: Start in the
meetingsmode. Ensure there is at least 1 meeting in the meeting list. -
Test case:
addnote id/1 note/Agenda: Discuss Q2 resultsExpected: Note is added into the meeting. Details of the deleted meeting shown in the result box. Meeting details panel updatd with the new meeting details.
-
Test case:
addnote id/0 note/Agenda: Discuss Q2 resultsExpected: No changes to the meeting. Error details shown in the result box.
-
Other incorrect addnote commands to try: duplicate notes
Expected: Similar to previous with appropriate error messages.
-
Delete notes from a meeting
-
Delete a note from an existing meeting
-
Prerequisites: Start in the
meetingsmode. Ensure there is at least 1 meeting with at least 1 note in the meeting list. -
Test case:
deletenote id/1 noteid/1Expected: Note is added into the meeting. Details of the deleted meeting shown in the result box. Meeting details panel updatd with the new meeting details.
-
Test case:
deletenote id/1 noteid/0Expected: No changes to the meeting. Error details shown in the result box.
-
Other incorrect delete commands to try: deletenote id/XYZ noteid/ABC (where XYZ and ABC are invalid values)
Expected: Similar to previous with appropriate error messages.
-
Saving data
-
Dealing with missing/corrupted data files
-
Test case: Navigate to ./data and modify the addressbook.json file to an invalid state
Expected: Empty address book when NoteNote launches. Any changes will override the corrupted save file when closing the application.
-
Planned Enhancements
Better way to add contacts to a meeting
- Background: The current way to add contacts to a meeting is to go into the meetings mode and add contacts to a specific meeting using their name.
- Issue: Users would have to remember the contact’s name exactly in order to add them into the meeting. If the user does not remember, the user would need to switch back to the contact mode to see the contact’s name before switching back into the meetings mode which can be troublesome.
- Enhancement: We plan on adding another panel such that users can see both their contacts and meetings at the same time which would avoid the trouble of switching between modes.
Better way to select contacts
- Background: The current way to select contacts is to use the view command and there are is no visual color feedback as to which contact is currently being displayed.
- Issue: The contact cards in the contact list panel can be selected with a mouse which causes a blue highlight over the clicked contact which would be confusing as you can only view a contact through the CLI.
- Enhancement: We plan to improve on this by disabling mouse clicks on the contact cards and also to have a visual color change on the respective contact card when viewing one.
Better way to handle duplicate contacts
- Background: The current way to uniquely identify contacts is through their case-sensitive name.
- Issue: There could be contacts with the same name which would be inconvenient for the user to workaround.
- Enhancement: We plan to improve on this by making names not case-sensitive and also to uniquely identify them through other fields like phone number and email.
Better way to display user feedback in result box
- Background: The current way of displaying user feedback is as follows:
New contact added: John Daaoe; Phone: 98765432; Email: johnd@example.com - Issue: This is a little hard to read for the user.
- Enhancement: We plan to display the output in multiple lines when necessary instead of using separators like
;
Standardise command format for indexes
- Background: The CRUD commands for contacts and meetings do not use the id prefix
id/while the notes commands do. This is because our app was built incrementally. - Issue: Might confuse new users, as it is hard to get used to.
- Enhancement: We plan to get rid of the id prefix, as well as the note id prefix for consistency.
Better support for handling invalid prefixes
- Background: The
addnotecommand does not detect invalid prefixes after thenote/prefix. - Issue: For instance,
addnote id/1 note/Likes chicken d/Roasted chickenwill save a noteLikes chicken d/Roasted chicken, even though thed/prefix may have been used unintentionally. - Enhancement: For now, we believe this is not a major bug. However, in the future we will add more support for detecting invalid prefixes across the various commands.